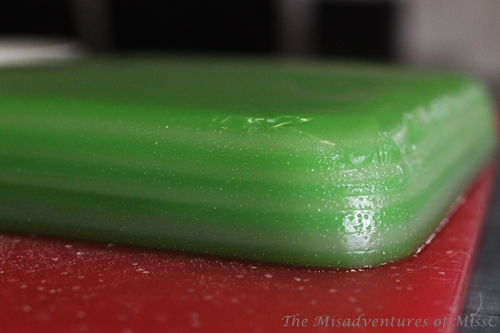
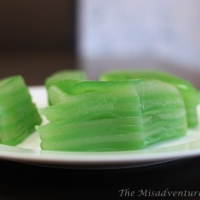
This little steamed tapioca layer cake goes by many names and comes up in a number of different reincarnations across South East Asia. In Singapore and Malaysia it’s referred to as keuh (or kuih) lapis. In Vietnam, bánh da lợn is a version where the layers typically feature mashed mung beans. Thailand also has a version of this, as does Indonesia. Basically talk to any kid who grew up with SE Asian food and they will have eaten a sweet resembling this at some stage in their life. Most typically by peeling the layers off one by one (my preferred method for chowing them down)! (Just so there is no mistake…I peeled those layers off in the pic below to demonstrate that they can come off one by one…)

This following recipe is based on the one from Kitchen Tigress‘, because just as she took the time to explain the subtleties of the variations in recipes for kaya, she has experimented with a few recipe variations for this steamed tapioca cake before she settled on this one. And it’s a damn good one too! I’ve applied her ratio of ingredients and have just adjusted it by 1.5x to fit my 20cm x 20cm square pan. The other two variations are mostly cosmetic, I’ve used green instead of blue and I’ve used a different pattern of layering. Also I don’t bother lining my pan with parchment paper because I have a non-stick pan. The cake itself is inherently oily from the coconut milk and I haven’t had problems with it sticking even when I didn’t use a non-stick pan.
This recipe omits the use of rice flour, because KT’s post explains, the addition of rice flour results in a firmer set cake and should only be made with thinner layers. As a lover of chewy textured things, I am totally in love with this tapioca starch only recipe. It’s perfection. I can even report that I’ve made a batch for my mum’s birthday and she LOVED it; which is saying something because my mother can be rather hard to please!
I’ve even gone and done the maths for you if you want to achieve 9 perfect layers. If you follow my recipe portions for a 20x20cm square pan, the following recipe will yield approx. 1250mL of batter. Divided by 9, each layer should be about 140mL (this figure has been rounded up for those of you checking my sums). 5 layers of green means 695mL of green batter and 555mL of white batter and once complete you will have a steamed cake with a height of about 25mm. I also love how this recipe brings out the maths geek in me. 🙂

A couple of quick rules to achieve this excellent layering effect:
- Only add on new layers once the lower layer has been set. You can test this by poking the layer with a chopstick. The layer should be firm in the centre.
- You need to add new layers on quickly. The top of the base layer needs to be hot in order for the next layer to stick on. So after you open your steamer, you need to quickly pour in the new layer. Don’t pour in the new layer after you’ve spent 10 seconds checking on whether the layer is complete or not. If you must check if the layer is done, make sure you re-steam it so that the top of the layer can get warm again before adding in the next layer.
Just a couple of more notes before I get to the recipe, fresh pandan leaves can usually be found at selected Asian markets. I get mine from Footscray’s Saigon Market, but if you don’t have any luck tracking it down, the frozen variety can be found at many Asian grocers. The coconut milk I’ve used in the recipe contains 70% coconut extract with the remainder being water. Using a coconut milk with a higher or lower concentration of coconut extract will alter the richness and potentially the density of the resultant steamed cake. Tapioca starch and pandan paste can found in Asian grocers and I believe even some mainstream supermarkets carry these products now as well, though these items are probably cheaper to get it from the Asian stores.
RECIPE – Steamed tapioca layer cake (makes 20x20cm square)
Adapted from recipe by Kitchen Tigress
Ingredients:
- 600mL coconut milk (70% coconut extract)
- 300g tapioca starch
- 278g sugar
- 1/2 teaspoon salt
- a couple of drops of pandan paste
- 4 fresh pandan leaves (8 if using the frozen variety)
- 260mL water
Method:
- Prepare steamer.
- To make pandan water, cut pandan leaves into ~10cm lengths and place into a medium sized pot with 260mL of water. Allow to simmer for at least 5 minutes to extract fragrance and flavour or pandan. Strain 240mL of pandan water and discard pandan leaves. (If you don’t have 240mL of water, just top up with tap water.)
- Return 240mL pandan water back into pot, then add in sugar and salt to dissolve over low heat. Turn off heat.
- Add in coconut milk and stir until uniform then add tapioca starch. Stir well to combine into a smooth batter. Strain batter to ensure no lumps. If there are any clumped up bits of tapioca starch, just push them through the strainer and mix well.
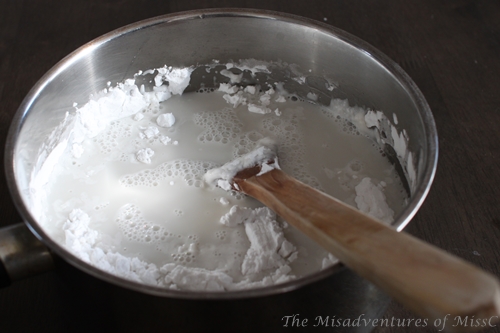
- Pour out 695mL of batter into a separate bowl. Into the 695mL of batter, add in a few drops of pandan paste and mix well until the desired colour has been reached.

- Pour ~140mL of green batter into the pan and steam on hight heat for ~5 minutes or until cooked through. Pour 140mL of white batter over the cooked green layer and steam for 5 minutes. Keep alternating 140mL of batter until all the batter is used up. You should give the batter a gentle stirring before each pouring to ensure the tapioca starch doesn’t sink.
- Once the final layer has been poured, steam for ~10 mins until cooked through (the top should be firm if you poke it with a chopstick).
- Remove pan from steamer and allow to cool to room temperature before cutting into individual pieces.
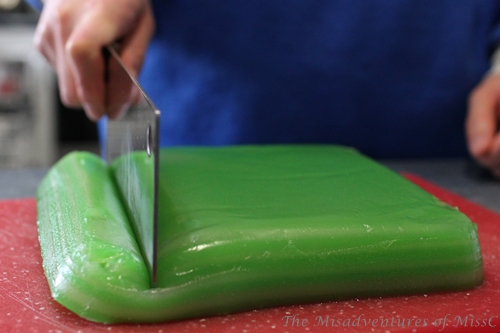
- To cut the tapioca cake, use a knife (or in my case, a cleaver!) larger than the cake and push in a single downward motion. Do not saw the cake because that will give you ugly edges.
- Store in an airtight container. If you live in a cooler climate environment, you will be able to get away with leaving it out on the counter in a cool location away from sunlight. If you live in a warmer climate, you should refrigerate these. Putting these in the fridge will alter the texture (making it harder), but they can be softened again with a gentle steaming. They will keep for a few days.
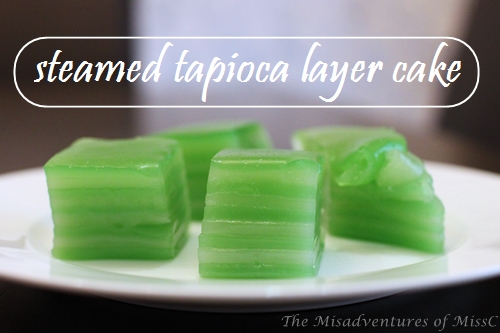


Diamond and triangular shapes of this little steamed cake is probably the most classic look. But it’s easier for me to demonstrate my layers in photographs in square pieces :). It is a little bit of a labour of love having to sit around in the kitchen cooking each layer individually, but it really is worth it. Hope you enjoy this treat from SE Asia as much as I do.


benting
September 29, 2014
Awesome! I love eating these (especially when going back to Malaysia), but never got around to finding how to make it! Thank you!!
MissC
September 29, 2014
No worries. Let us know when you do get around to making it 😉